If you are considering laying your tiles then learning to fill the joints correctly is an essential but often overlooked part of the process. I am always amazed at the number of professional tile setters who will leave a junior with the idea that this is an easy and less important part of the job.
While it is true that strong grouting does not look good on a poor tiling job, well-performing grouting can look awful in the installation of different tiles. So, obviously, this is a very important factor and it should be done properly.
Fortunately, learning to grow is not difficult. Although there are many brands of grouting materials on the market, there are only three basic types. Cement-based (or synthetic); Polymer modification and epoxy. This article only deals with two because epoxy is a bit of skill, and while it’s not a nightmare that a lot of people will have to believe us, there are subtle differences in its application and method of application.
Table of Contents
Techniques To Grout Ceramic Floor Tiles
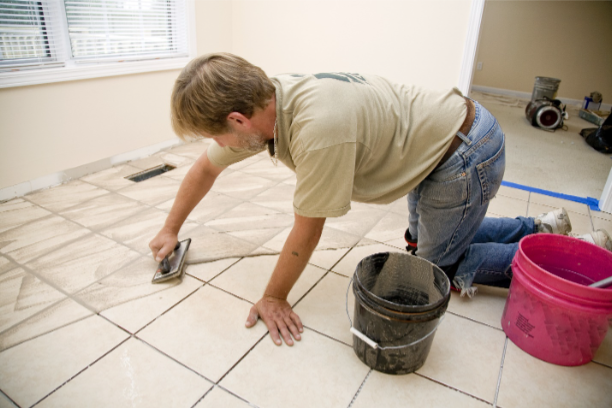
Well, grout, of course, a pair of clean buckets, for mixing and later cleaning, a good trowel (flat, or square nose types are best), a grout squeeze, a white nylon scrub pad, and supplies Sponsored for supplies. It is also a good idea to wear some rubber gloves as the cement scratches the skin.
Before you start mixing, first make sure of tile cleaning and dry, and remove any visible areas with adhesive marks from the tiles that have been pushed through the joints while laying the tiles. OK, mixing time: follow the instructions on the bag; they can all be very different. Pay special attention to the recommended amount of water.
Mix Water Accordingly
Usually, water is poured into a clean bucket, and then the powder is added from the bag. Be careful here, a little water eats a lot of powder. If you are doing only a small area and you have bought a very small bag, you can easily find that you have poured too much water and then there is not enough powder for proper consistency. So make your first mix smaller, the next one can always be bigger.
Mix powder and water so that it is flowing free, creamy consistency. If you are using ready-mixed products, you will find that it is a bit thick. If you are doing a great job you can get a mixing pedal to use the drill, but be careful to set low speed, it is not advisable to blow more air into the mixture. Some brands instruct you to do this before leaving the cement at this stage.
Okay, so now we start falling. For the wall, place a small amount of mixed grout on your floor, and start spreading it on the tiles. If you survive, you can keep this mix where you want to start. Now, using a squeezing blade, start grouting the joints.
Hint: Work briefly across pairs, for example, working from left to right. Work in the same direction, filling both vertical and horizontal joints evenly, keeping open joints in front of you at all times. Try to avoid pushing and embarrassing yourself, but leave some space behind, after which you will come back. When you try to fill them, it will jointly produce airplanes or bubbles. Having an open joint in front of you gives you air to escape from, as a result of being homeless.
Get rid of clutter
Next, when you make a small section, remove any excess residue from the tiles by placing the edge of your extract on the tiles and dragging it diagonally across the joint. Not only does this remove excess material or clean it with a sponge, but it also helps compact grout in the joints. Plus, you’ll be getting rid of clutter you don’t need, and you’ll get rid of clutter you don’t need. When you have finished all the things you are going to do, set the grout bucket aside, but don’t throw it out right now.
It’s hard yet until it’s fixed, I can’t give you a set time here because it depends on the specific product, the strength of the tiles, and the temperature. Products but even then they will be confusing.
The move will not end soon, as you will pull the ground out of the joint, or leave it full of air holes. Leave it too long and it will be difficult to remove the residue. The first sign is that the grout is coming to a stage where it can be washed, when it starts to dry on the surface of the tile, it usually turns a light color. Find it and also gently press the soft joint to see if it is starting firmly, if it is easily depressed, wait a while.
Read Also: 8 Reasons You Need To Try Desert Safari Dubai
When ready, grab your clean bucket, a nylon scrub pad, and a fresh, clean sponge. Wet the scrub pad and let most of the water flow, so it’s just wet, but not dripping with water. Using a circular motion, lightly clean a small area to loosen the residue from the surface. As soon as the pad foams with water, you will see some bubbles.
Keep walking, keep the pad on the clean side as soon as it is filled by the client. To continue, wash the pad in water until dry, and move on. When you work, try to use the pad to know the edges of the tile in detail. Now go to SpongeBob and see this technique:
Remove the sponge to keep it moist
Place a sponge on the tiles below and make a box with your arm, of which there is only one, and don’t go back to what you’ve just done. Make sure your ‘swipe’ is with the joints instead of crossing them.
Now, pick up the sponge, and turn it over to a clean face, go back to the beginning, and make a second arc adjacent to the first.

Don’t put your dirty face down on the floor – you’ll just scatter the residue, you won’t take it out.
As soon as you have finished all the clean faces of your sponge, rinse it thoroughly in the bucket and start again.
Keep an eye on the water in the bucket, throw it away as soon as it becomes clear, rinse the mud to get fresh and clean water.
Keep rehearsing it until you can say it with conviction and confidence because in the long run it will save you time and reduce the amount of smoke you need. As you move the sponge across the joints, you can help smooth them out, being careful not to dig into the joints (if you do, take a little grout from the bucket you placed before).) And take it upstairs, come back. Then take a few minutes after that). When you’re done, you’ll need a second wash. You will need to wash less whenever you change the rinse water and avoid putting a dirty sponge on the floor.
Once it is dry enough (but not completely cured), you can use a dry scrub pad, or even a towel, to avoid dry washing, and wall or floor tiles. Tighten. Like Grout, do the profession. If you have a lot to do, or you want to speed up the job and make grout cleaning a little easier, go for a really good float-style squeegee instead of a rubber blade DIY.
Also, if you really want to become a professional, think about getting a wash boy seat – this is a specially designed bucket in which the cleaning rollers (often on wheels) are handled with a large, flat sponge. Or sponge board). A good wash will remove as much residue as possible from the broom, leave the joint nice and flush, and help keep you out of the water with your hands – for example on larger floors.